Category: Photo Editing

  • 5 Basic Color Correction Techniques Using Photoshop CC

    5 Basic Color Correction Techniques Using Photoshop CC

    There are many features, new and old ones that make Photoshop standout from the rest of popular photo editing tools. Photographers, web designers and graphic artist, to name a few, benefit from using the Creative Cloud version of Photoshop.

    This graphics designing software will help every user edit pictures depending on the purpose, its demand and supply analysis for career and business. One of the best ways to earn income is to begin using your technical skills in photo editing. It can be done either in an offline or online operation.

    Because it is important to promote products online, you can also consider designing your own website. When you fully developed the skills necessary to master photo editing, you can also apply for online jobs for related projects. These projects can also be done either in an online or offline basis but most web design companies prefer offline work because of then use of the printing press, photo studio and related offline design works.

    From the advantages mentioned, everything boils down to color grading, adjustment and manipulation in photo design and editing. When using Photoshop CC, it is a requirement to know the basic skills and techniques in white balance and color correction. It is for a fact that in order to make a correct balance, it is very important to know the different aspects of setting and familiarize white balance using a camera.

    Five Color Correction Techniques Using Photoshop CC

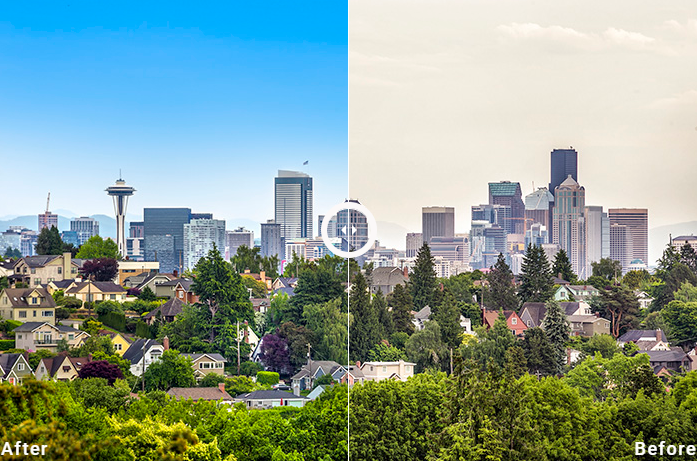
    Our eyes are very similar and in a way, comparable to a camera. Our eyes are excellent when it comes to making an automatic white balance. But cameras are not as good as our eyes in doing this. Below are five color correction techniques using Photoshop CC.

    1. Add the Threshold Adjustment and Curves for color correction

    When creating a new layer, go to Edit and Fill then select the layer with 50% gray. The layer blend mode must be set to Difference. It is important to set the Threshold level to 10 and grab the Eyedropper tool while holding down the Shift button. You need to click to drop the color over the black spots.What follows next is to delete Threshold and add Curves Adjustment Layer. While zooming in the eyedropper to the area of interest, click once to have a color balance.


    video credit 2 Minute Photoshop

    video credit PiXimperfect


    video credit Learn Color Grading 2. Skin Color adjustment

    To set skin color to perfect, you will be shown with the skin color breakdown of White, Black, Latin, and Asian while balancing a fair amount of magenta, yellow, black and cyan for a perfect skin. The real technique in this tool is to choose a great area from which colors are adjusted and measured.
    video credit Learn Color Grading


    video credit Prince Meyson
    3. Adjust the White Balance tool in Camera RAW editor

    In using this tool, you need to open the image in the Camera RAW editor to change the image to a smart object and go to Filter then Camera Raw Filter. While choosing the White Balance tool the neutral point in the photo to automatically make the white balance corrected.


    video credit Pink Flower Photography
    4. Adjustment for Hue and Saturation Layer

    This is the fourth method of color correction with the use of Photoshop CC. It basically needs a /hue and Saturation adjustment layer. You need to utilize the channel drop down to point any color that is overwhelmingly seen in the photo. Shifting the hue to reduce the saturation will make a big difference. But there is a limitation in using this tool. This method works amazingly when there is a color that is obviously affecting uniformity of the whole image.


    video credit tutvid

    5. Free Hand adjustment

    Using the ‘finger’ icon, this will take a Curves adjustment layer while the channels can be Red, Green and Blue. You have to drag either up and down on any part of the photo to introduce Red/Cyan, Green/Magenta or Blue/Yellow whenever there is a need to do so. In a photo whose orientation is landscape, this technique is really effective.

    Conclusion

    Understanding the basic color adjustment manipulation in Photoshop CC is very common in numerous photo editing techniques. There are times that removing a tint can be a good choice. There are also instances where the background layer of the original photo needs to be corrected. Whatever the adjustment may be, it boils down as to how skillful and artistic the editor is.

    Every design that needs to be added or removed, every color and curves that needed adjustment or every contrast that needed to be brighten of darken, images are ‘photopshopped’ for perfection. It is this tool that really determines the needs of a particular image. Using Photoshop CC as your tool commands various options for color correction.

  • Top 13 Photoshop Techniques for Photographers

    Top 13 Photoshop Techniques for Photographers

    One of the challenges of being a photographer is finishing the photos. In today’s advanced technology, photography has arrived into another progressive technical production that not only about capturing pictures, but also producing the best images. Creating quality photographs reveals the photographer’s perspective and enthusiasm. And that passion is very important in photography.

    In this article, you will discover few skills that will help you acquire more inspiration to your photography.

    Learn the possibilities with this guide that will develop you to enhance your photographic skills and abilities, by giving you thirteen Photoshop techniques.

    1. Cropping


    video credit: Photos In Color
    The common and easiest way of editing and or creating an amazing image is by using the Crop process. This task is very easy to understand and do. When you click the Crop Tool, you can drag the selected part of your photos that you want to eliminate. And when you get to explore, there are few innovative features that can be very beneficial for you. Through constantly clicking O on the keyboard you can set by the existing instructions containing rule-of-thirds, golden ratio, golden spiral, whereas pressing on the component character in the toolbar at the upper part of the crossing point will ascend further presentation and other selections. Selecting the Crop Tool sign at the far-left of the toolbar unlocks a list of options having presets, and you can make your particular presets if you frequently crop pictures to specific dimensions.

    2. Quick Mask mode for selections


    video credit: How To Gurus
    Basically, painting with a black brush produces the mask and white deletes it, and by means of a feathered or hard brush forms a hard or soft border for the selection. To type Quick Mask mode, press down Q on the keyboard; when the mask has been produced typing Q down once more goes it into a selection.

    3. Using adjustment layers


    video credit: O’Reilly – Video Training
    Adjustment layers are retrieved by selecting on the half-white, half-black circle sign at the bottom of the Layers panel. Put together all you will need to save it as a TIFF or PSD if you would like to save a photo with adjustment layers since a JPEG is a compacted and compressed document type that doesn’t hold up layers.

    4. Converting to black and white


    video credit: Professional Photography Tips
    The Black and White adjustment layer is a great choice if you opt for a JPEG file in Photoshop and want to change it to monochrome. You’re free to apply one of the twelve presets which is default conversion, or automatically change to greyscale by the sliders.

    5. The Camera Raw filter


    video credit: rafy A
    The appropriate technique to apply this filter is to either create a duplicate of the Background layer, or combine the evident layers into a different layer above of the stack (choose the foremost layer and press Ctrl/Command Prompt + Alt/ Option + Shift + E), then go to Filter > Convert For Smart Filters. You are now able to use the Camera Raw filter, and return and edit your adjustments later if you need.

    6. Healing Brush


    video credit: Katherine Jackson
    To apply the tool, press down the Alt/Option key and click near to the part you wish to touch up to sample the extra pixels for the healing, afterward, click and drag to brush the tested pixels into the part you want to correct.

    7. Customize the workspace


    video credit: Terry White
    The default Photography Workspace has all necessary tools for photographers that Adobe thinks must have by using Photoshop, nonetheless, one size hardly fits all, so it’s worth modifying the section layout to be appropriate on your manner of working. Sections on the right of the Photoshop interface is possible to remove by trailing them out of the dock, and different ones included by going to Window menu in the leading menu bar and choosing the wanted panel.

    8. Dodge and burn


    video credit: Prince Meyson
    To apply the Dodge and Burn tools, use on either the Background layer or a duplicate of it, as the tools are ‘negative’, as they always change pixels. Now you can just smooth the part with the Dodge Tool to increase brightness, or with the Burn Tool to decrease brightness. These tools have Shadows, Mid-tones or Highlights. The tools are best for low exposure for example 5-10% and create the desired outcome systematically.

    9. Create a contact sheet


    video credit: Bojan Živković
    To make a contact sheet, place the desired photos, or duplicates of them, in a folder. Then go to File > Automate > Contact Sheet II and arrange selections such as image source, paper size, and layout. After all, has been designated Photoshop will produce contact sheets to be saved automatically.

    10. Blending Modes


    video credit: Photoshop Training Channel
    Just creating a duplicate of the Background layer by choosing it and pressing Ctrl + J, you can blend already. With the different layer ready, go to the drop-down menu above of the Layers panel – it is fixed to Normal by default – and test with the diverse mixing modes.

    11. Frequency Separation


    video credit: Brandy Renee Photography TV
    It is very applicable in evening out skin. Use carefully and in balance.

    12. Crushing Highlights with Curves


    video credit: utvid
    Crushing highlights by taking the top point on the right side below slightly, and then place another point close to it decreasing its tonal range.

    13. Warp Tool


    video credit: Blue Lightning TV Photoshop
    This tool is useful for fine-tuning a part of a photo. The step is easy. Just press CMD + T + Warp tool.

  • How to Find the Best Photo Editing Services in Seattle

    How to Find the Best Photo Editing Services in Seattle

    Photo Editing Service is one trending topic for shutterbugs at the moment. But, why is it? Basically, a photo editing service corrects the photographs that you take. By way of a tangible image editing service itself, this can be made of comprehensive modifications of colors and exposure through a series of photos, effectively to local changes on an image-by-image groundwork like dodging and burning, cropping or spot deletion. As well as photo restorations, the photo editing services can likewise take in things such as removing and resizing, photo repair, color correction, image enhancement and graphic design.

    One of the main purposes of photo editing services is to save time. You can have so much time for yourself and other stuff you want to do when you have someone else to mind all of your post-production. Especially when that someone is expert in this field. Your photos will be professionally done.

    Before looking for best photo editing services, here’s an essay on what are the essential things to find the best one out there.

    Seek for a Photography Enthusiast

    One should have a keen on details for you to have a good edited image. It is a must to have a photography skill such to have a good eye for photo quality and vivid substance.

    Be Practical

    The editing of your photos depends on the quality of your images. One should always give excellent photographs to repair it smoothly. Your photo repair can’t work wonders, so better have your hopes on balance with your existing work.

    Don’t anticipate exactness

    Your photo repair can’t give you what you want all the time. There will always be occurrences where photos aren’t edited correctly how you want them to be. Expect that it will turn out just right.

    Be Persistent

    Inevitably there are some errors in the process. The photo editing service you hire may not get what you want for your photos and even not to meet your expectation, but you need to be patient because there will always be a trial and error approach. And how to do that is through number 4.

    Be Communicative

    This is a must for you to have a good outcome. It will simply make all things stress-free afterward.

    —-

    Featured photo credit to https://www.digitaltrends.com/.

  • Free Editing Tools for Your Real Estate Photos

    Free Editing Tools for Your Real Estate Photos

    Real estate photos have to be polished and of high-quality all the time. These are best used for sales and marketing in order to sell your properties fast.

    Photos can also make or break your business. When you post a low-quality photo for a listing, most of those who are in the market might not even bat an eye on your property. In turn, this can affect your sales and your bottom-line.

    Using photo editing tools is a must in order to post-process and make photos better. This helps in creating amazing images that convert. If you’re in need of photo editing tools for your real estate photos, here are some free tools that you can use:

    • Canva.

    canva

    This is one of the most used tools for creating visuals across different industries. Canva is a web-based for graphics, logo, textures and other creative designs. It’s a user-friendly tool that makes anyone seem like a professional graphic artist. The tool has a drag-and-drop interface and provides you access to different layouts, photographs, fonts, and graphics for your needs. Aside from editing your photos, you can also use Canva to great graphics and photos for social media use.

    • PicMonkey.

    PicMonkey

    The program has a similar interface to that of Instagram. It has a free and a premium version that you can use to enhance your photos. You can also add text, borders, and buttons on your images that you can use for listings and social media postings. It has a live preview feature for faster editing. You can also choose a print or an online quality for your image, depending on how you’re using it.

    • Pixlr.

    Pixlr

    This program has a desktop and a mobile version that you can use. Their free web app makes a majority of the editing tasks a breeze. You can do a ton of different edits through Pixlr. You can crop the photo, adjust the color balance, contrast, and brightness, and make eye corrections. It’s a great tool for both beginners and intermediate editors.

    • Gimp.

    gimp

    This is a free and an open-source software that’s been around for a while now. Gimp can be used across multiple platforms. It can be a useful tool for resizing, adjusting the contrast or light. It’s great for doing simple editing options and in creating certain looks that you want for your photos. No matter what your photo editing knowledge is, Gimp provides you with sophisticated tools that you can use for image manipulation and in getting the job done. What’s great about Gimp is that it has a large community that can help beginners in using the software.

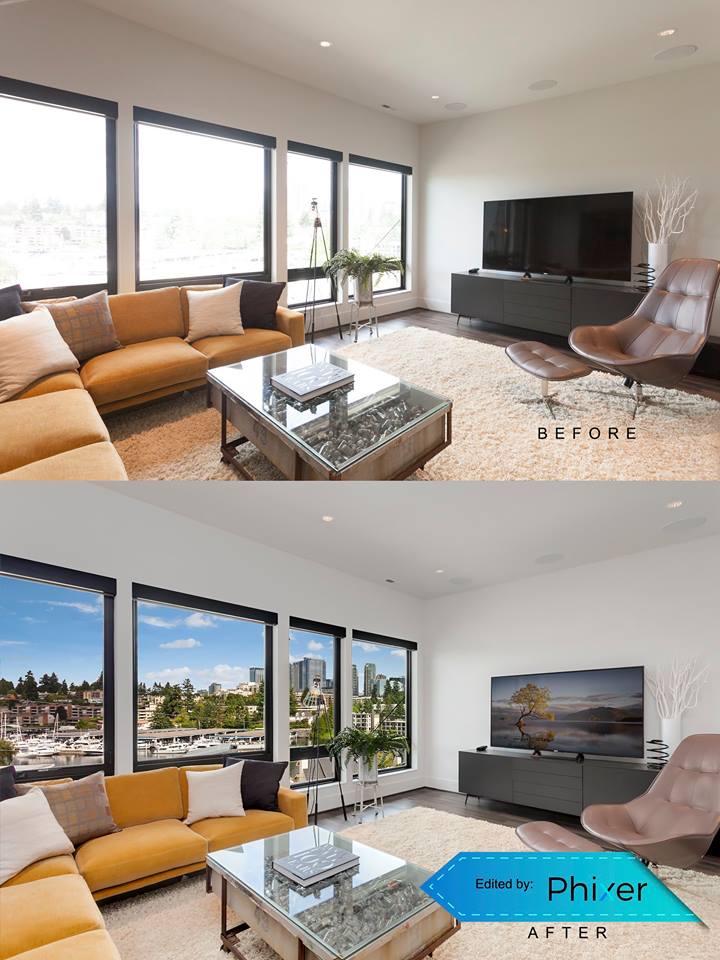
    If you want hassle-free photo editing without doing all the work yourself, you can contact Phixer to do the post-processing work for you. Phixer has a professional team of photo retouchers that are experienced with real estate photos. This ensures that you have high-quality photos for your listing while you can focus on the more important parts of your business.

  • Complete Understanding About Photo Editing Services

    Complete Understanding About Photo Editing Services

    They say a photo is worth a thousand words, and a properly edited one probably expresses a million different things at a time.

    In today’s competitive marketplace where photos have the power to represent a brand or a business, photo editing services is rapidly becoming one of the most outsourced processes in the industry. Nowadays, the general public are becoming more and more image-centric and they tend to relate to visual cues better, making good quality photos a powerful tool to build a brand and generate more sales. This is where photo editing services come in.

    But what is a photo-editing service?

    Basically, a photo-editing service is an outsource company that edits your photos for you.

    Being a photographer entails a lot of work. It means not only shooting and editing the photos, but also dealing with clients. In fact, a recent studies have shown that photographers spend almost thirty percent of their time editing photos, almost thrice as much as actually shooting pictures.The job of a photo-editing service is to help photographers who value their time by doing the daunting task of editing the photos to make it better and more attractive. Examples of photo editing services are usually photo color correction, photo restoration, real-estate photo editing, portrait photo retouching, and high-end photo retouching.

    still-life-product Photo Editing
    photo http://fierroworks.com/still-life-product-photography-retouching/

    What are the services usually offered?

    Typically, a photo retouching company usually specializes in photo retouching, corrections, and manipulations. The services include:

    1. Real-estate image enhancement.
    Photo editing services make real estate images more professional by enhancing the background to provide a more accurate version of the property, remove unwanted objects or extra elements, control the brightness, clean the background, adjust the contrast to make it more presentable for customers, change the scenery, alter the overall light color and provide a more natural appearance by adding shadows.

    Best Real Estate Listings

    2. Photo restoration. It uses different techniques to restore fading and discolored photographs to original conditions. Photos damaged by rips, creases, mold, water and fire are fix are restored, while black and white images are turned into colorized photos.

    3. Photo retouching. Photo editors changes the colors, remove spots or blemishes, retouch product photo, correct exposure errors, eliminate marks and scratches, make subject blend seamlessly into the background, and overall enhance the details of the photos.

    Other services also include: removing background from picture, adding a drop shadow to create a sense of reality, creating a 3D effect as the image casts an image shadow or reflection, and vectorizing of images using Illustrator Pen Tool.

    What are the benefits of using a photo-editing service?

    1. Economical. Editing photos consumes a lot of time, and for photographers and business owners alike, employing a photo editing service company to edit the photos definitely comes handy. It saves time, money, and effort, and makes running a business a whole lot easier. Business owners and photographers can focus on other aspects of the business such as taking photos and managing and dealing with new and prospective clients.

    2. Better sales. The main purpose of photo editing is to make a photo more appealing, and a well-edited photo speaks volumes to what a business or a brand represents. Photo editing services make sure that you present your product in the most visually attractive way. This, in turn, can give you a bigger chance of generating more sales.

    3. Increases credibility. Photos are always an essential part of any marketing and branding activity, and the use of good quality photos is an effective way to increase the credibility of your business. Images are necessary to build a brand. With the help of a photo editing service, customers tend to find it easier to trust a business that projects high quality images.

    What makes a good photo editing service company?

    photo http://www.expertreviews.co.uk/software/photo-editing/1404359/best-photo-editing-software-make-your-pictures-shine

    1. Cost. Cost is always a major factor. You want to find a company that matches your budget without sacrificing the output. Look around and compare the prices of different companies.

    2. Experience in the industry. As a photographer or business owner, you want to entrust your photos to a company that has a proven experience in the industry. Google the company, look for customer reviews, and see sample works prior to availing their services.

    3. Team of skilled workers using the latest software. It is important that the photos are being handled by well-trained professionals who incorporate latest and advanced software in the editing process.

    Provides a one-stop solution for all your editing needs. A good outsource photo editing company offers a wide range of photo editing services any photographer or business owner may demand for as this reduces their work of looking for other companies to provide other services.

    Final words

    In today’s competitive market, the employment of photo editing service has been proven to be a beneficial way for photographers and businesses alike to achieve their business goals.It cuts unnecessary spending, saves time and effort, and helps gain credibility from customers.

  • Photoshop CC Quick Guide for Real Estate Photography: Blending Ambient and Flash

    Photoshop CC Quick Guide for Real Estate Photography: Blending Ambient and Flash

    Taking photos of real estate can be tricky. It’s not just something that you can do quickly and send to clients in the hopes of being able to sell their properties. Real estate photography is more than just taking pictures. There’s more work to be done after every photo shoot. The real estate photography retouching and editing can take a lot of time, especially if you want to produce amazing photos for clients. Retouching and post-processing is an essential part of real estate photography. Having mastery of Photoshop and other post-processing software is important.

    Retouching in Photoshop

    There are different things that can be done in Photoshop for real estate. The goal is to make the image look realistic, as well as make the property look its best. Through Photoshop, you can adjust the colors and the lighting of the property or change the sky.

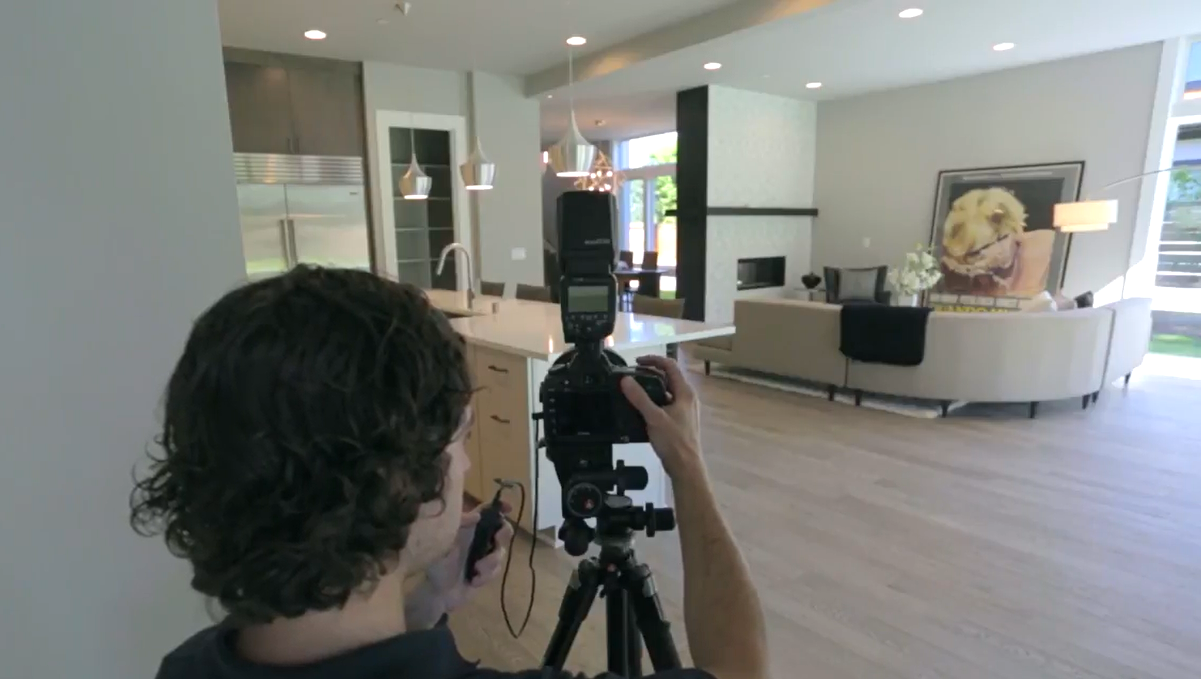
    One of the most useful editing tricks is to blend ambient photos with flash photos. This can be most effective for interior photos. Often, you do not capture the perfect image just with your camera. The lights can be off and you have a variety of light source that makes the image look crazy. To combat this problem, most real estate photographers take multiple photos of the same subject in different lighting settings. Then, you merge the photos in order to get the best lighting in the image.

    Blending ambient and flash photos

    Blending Ambient and Flash

    Blending different photos in order to create one seamless image with amazing lighting can be tricky but doable. If you need to blend ambient and flash photos into a single photo, follow these steps:

    1. Open all of your images. Make sure that you have opened all the ambient and flash photos in your Photoshop. You might have photos of the lighting fixtures inside on and another photo with the lighting fixtures off. Arrange the photos and make the ambient photo your base layer for blending.

    2. Edit your lights-on photo first. Before you start blending, make appropriate corrections for each the photo. On your lights-on photo, switch the blending mode to lighten. If you have visible lighting fixtures, you might want to brush in the lights. Put a black layer mask. Click on the brush tool and set the flow to 30 percent. Brush the area where the lights are. Make sure that the lights are already visible.

    3. Correct your lights-off image. Retouch your lights-off layer by putting a black layer mask on top. With this, you want to tone down the bright areas of the image, like where the ambient lights are hitting and other sources of light.

    4. Use stamp visible. This is a very helpful function that creates a new layer of the content that you want to merge. Make sure that you make all your working layers visible. Then, go to Layers menu and click Merge Visible while holding the Alt key.

    5. Align your verticals. Make sure that you have straight lines on your image. The problem with shooting interiors is that you get slanted lines all over. First, you can try to use the Lens Correction function under the Filter menu to see if Photoshop can automatically straighten the lines. Photoshop usually matches the camera and lens used to create the image and automatically corrects the minimal distortion. You can also use the Skew function under Transform. This allows you to align your verticals manually. Just pull the corner until your verticals line up with your guide.

    6. Remove unwanted objects. If there objects in your frame that you want to remove, like some light stands that are in the frame, make a new layer. Click the Spot Healing Brush tool and go over the areas that you want to remove.
    Crop the photo as needed. Make sure that you don’t include unnecessary parts in the photo. Click on the Crop tool. Crop the image as needed in order to bring the focus into the interiors. This also removes unnecessary areas in the photo.

    7. Flatten the image. Once you are happy with how the photo looks like, make sure that you flatten the layers to create one image. This would be your deliverable to the client. To flatten, make sure that the layers you want to retain are all visible. Then, go to the Layer menu and click Flatten Image. Now, you have a single photo that has all the edits that you’ve done.

    There are still a lot of other Photoshop tricks and edits that you need to be familiar with as a real estate photographer. Just like being in photography, everything takes practice. Make sure that you train your eye and keep shooting. Find angles that will work for the specific space andproperty. Editing in Photoshop is time-consuming. Once you are used to it, you can easily find a flow that works for you.

  • Top 13 Real Estate Photography Editing Techniques

    Top 13 Real Estate Photography Editing Techniques

    The post-processing for real estate photography takes a good amount of time for many photographers. This usually takes a huge amount of time as this is an important step in creating amazing images that will help clients in selling their property.

    There are different techniques that photographers can use and do in order to retouch and make the properties look great in photos.

    Here are some of the basic and most commonly used editing techniques for real estate photography:

    1. Perform color correcting.

    Perform color correcting real estate photo

    Color correction is probably one of the basic and essential steps in real estate photo editing. Color correction can be done on Lightroom and Photoshop. However, it’s easier and quicker to do it on Lightroom. With the eyedropper tool, just click on a neutral area to correct the colors of the entire image. Depending on the photo, you might need to adjust the saturation, hue, and tint in order to get a more realistic image.

    2. Straighten the lines.

    When shooting properties, you need to be extra careful with your lines. You need to make sure that these are straight and not bent in some way. Whether you’re shooting interior or exterior, you have to look at the lines and shoot them properly. However, you can always retouch them after a shoot. To align the lines in Photoshop, you can use the Free Transform. Make sure that you select the entire image and drag the corner of the image opposite to where the lines are leaning towards.

    3. Even out the light.

    Even out the light.

    When shooting interiors or exteriors, you might encounter problems with the shadows and uneven lighting. To combat this, use Lightroom to adjust shadows, highlight, whites, and blacks. Drag the Shadows bar to the right in order to open up the shadows a little bit. Make sure that it is a safe middle ground. If you have harsh highlights on the photo, you may want to drag your highlights bar to the left in order to bring down the hot spots. To adjust the whites and blacks, hold down the Alt key on your PC or the Option key on your Mac. Bring the whites or the blacks bar to the right until you see specs of white or black on the image.

    4. Clean up the image with cloning.

    cloning photoshop cc

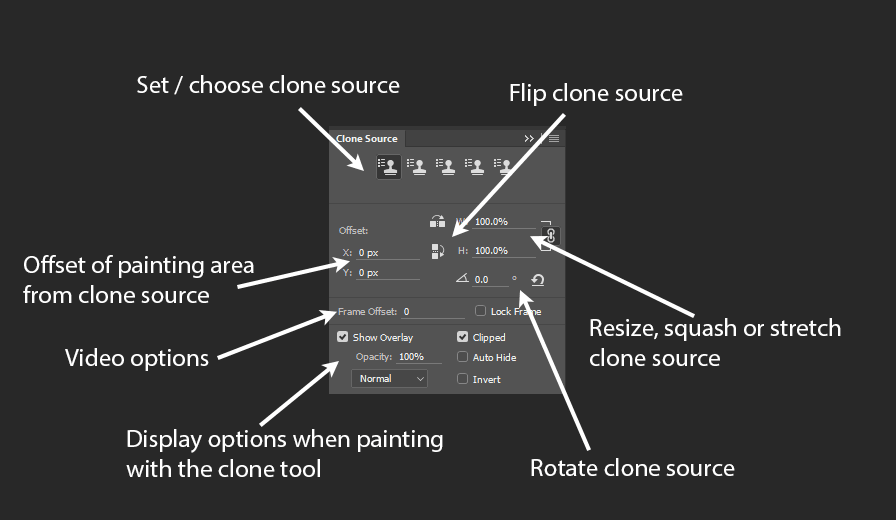
    Remove unwanted objects in your photo using the clone stamp tool in Photoshop. Click the clone stamp tool and choose the source area. Then, you can start cloning and painting over the object that you want to remove.

    5. Adjust clarity.

    On Lightroom, just push the clarity to the right in order to polish the photo. With adjusting the clarity, you might want to adjust the blacks as well in order to add depth and crisper look to the image.

    6. HDR.


     High dynamic range (HDR) is a technique that many real estate photographers use to create a greater dynamic range of luminosity. To create HDR images, make sure that you have shot your subject in different bracketed images. Then, all you have to do is merge the photos into one to show its highlights and shadows.

    7. Lens correction.
    lens correction

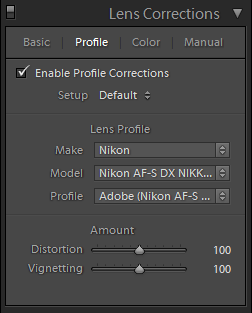
    This is a handy tool that you can use in Lightroom. It corrects the optical issues found in most lenses. To use this, just go to the Lens Correction module and click Enable Profile Corrections. Then, click on Remove Color Aberration.

    8. Curves.

    curves brighten histogram

    The Curves is a powerful tool in Photoshop. This can be used for color correcting and optimizing your colors. However, it can be an extensive tool that can be challenging to master. To use Curves, go to the Image menu, choose Adjustments and click on Curves. Click Auto in the dialog box. Drag the diagonal line at the center and pull it up to brighten the image or down to darken it. When you’re already happy with the outcome, click OK. You can freely play around with this tool and experiment in order to achieve the look that you want.

    9. Using image processor.

    The image processor allows you to resize your photos in batches. This is a time-saving tool, especially if you are working on hundreds of images that will have to be used in different mediums. To use the image processor tool, select File menu and click on Image Processor. Choose Folder in the dialog box and save in the same location. Choose JPEG as file type and click on Resize to fit and put in your desired dimensions. Make sure that you include the ICC profile and click Run.

    10. Playing with hue and saturation.

     hue and saturation photoshop cc

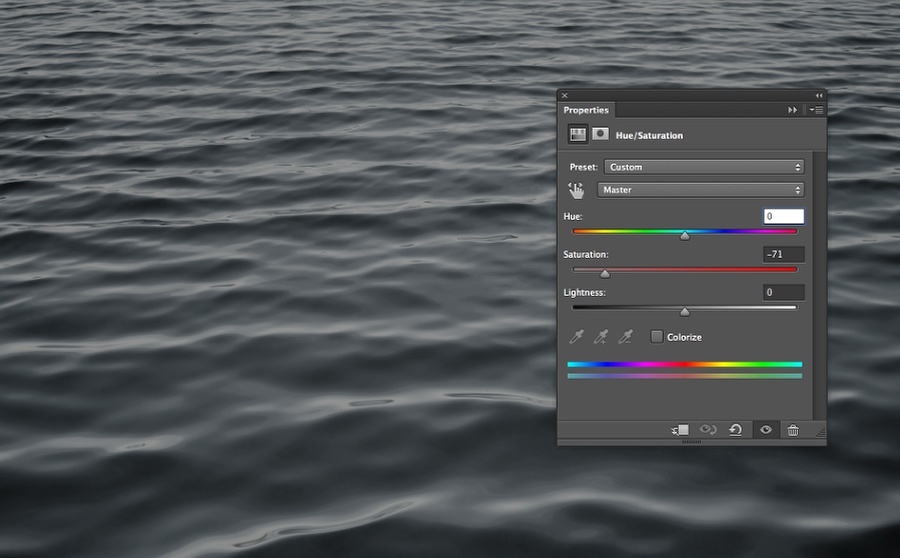
    Hue and Saturation is another helpful tool in Photoshop. This can be used for color correction and is also similar to Curves. However, Hue and Saturation can be used to enhance the greens on exterior and landscape photos. To use Hue and Saturation, go to Image menu, choose Adjustments, and click on Hue and Saturation. Choose Yellow from the dialog box. Increase the hue and decrease the saturation and lightness. Change the option from Yellow to Green and repeat the changes you’ve made to hue, saturation, and lightness. Then, click OK.

    11. Do composites.

    Composite is an ingenious technique that merges different photos to create a seamless image. This can be used in real estate when you’re blending together different images, such as stitching flash and ambient shots into a single photo. This is often done on instances wherein the subject is manually lit by the photographer using a handheld flash.

    12. Batch edit, if possible.

    If you’re working on similar edits on a number of photos, it’s best to batch edit them using Lightroom. This allows you to save time and do the minor edits all in one go. Just do the retouches and adjustments on one photo and sync these changes into the rest of the images.

    13. Keep it natural.

    The final yet most important photo editing technique when retouching real estate photos is to keep it natural. It can be too easy to go overboard when editing photos. However, you need to make sure that you create a more natural look in order to make the photos believable. The goal in real estate photography is to sell the property. Make sure that you err on the natural side every time you retouch your images.

  • Interior Photos: Basic Editing Using Lightroom

    Interior Photos: Basic Editing Using Lightroom

    Interior photos are beautiful but also can be very challenging to shoot and edit. However, they make up the majority of the photos in a given property listing since buyers are interested in what’s inside a home.


    interior editing using lightroom 1
    Photo Editing Company

    Aside from putting the work in shooting the property, you also need to take the time to retouch and post-process your images before you hand them over to the clients. Amazing photos take time and effort, especially if you are shooting interior photos.

    Using Lightroom

    adobe lightroom logo - phixer

    Adobe Lightroom is a staple tool for many photographers, no matter what their niche is. This software allows organizing, viewing, and editing a large number of images. This is great for non-destructive editing that still keeps the data of the original image.

    Lightroom will allow you to batch edit and adjust the lighting and colors on your images. This is a great quick tool to go over images for some minor or basic editing.


    Aligning your verticals

    Aligning verticals lightroom
    photo by Shopify

    One of the most basic, yet most necessary editing that needs to be done on all interior photos is aligning the verticals. This can be easily done on Lightroom.

    1. Use transform tool under the develop tab and make the proper adjustments.
    2. Make sure that the columns and the edges of the furniture are straight and aligned properly.


    Adjusting the brightness

    One of the usual issues when shooting interiors is dark images. There is an easy fix to this problem.

    brightness adjustment lightroom

    1. Open up the shadows in your image a little bit by dragging the shadows to the right. Adjust accordingly and make sure that you don’t highlight all your photo. A middle ground would be perfect.
    2. If needed, you might want to bring down your highlight a little bit. This does not work for all interior images unless you see some hot spots or there are a lot of bright lights in your photo.
    3. Hold down the Alt key on your PC or the option key on your Mac, and bring the whites bar to the right until you see specs of white on your photo. This will define the white on your image.
    4. To show the blacks on your image, hold down the Alt key on your PC or the option key on your Mac. Bring the blacks bar to the right until you see some specs of black color on your image.


    Correcting the white balance

    Changing the white balance on interior photos can be a matter of personal taste. Often, the white balance in interiors can be off since you have several light sources. One of the easiest ways to correct the white balance is to use the eyedropper tool.

    eye dropper tool lightroom
    photo by www.lightroompresets.com

    1. Click on the eyedropper tool on your Lightroom and find a neutral color. You can check the RGB percentages on the tool as you go over some areas of the photo. It would be best to pick white or a gray area.
    2. Once you click on the right color, this will automatically correct the white balance on your image.
    3. Adjust the temperature and the tint as to your liking. Increase the temperature a bit if the photo is too blue and bring the tint to the right.
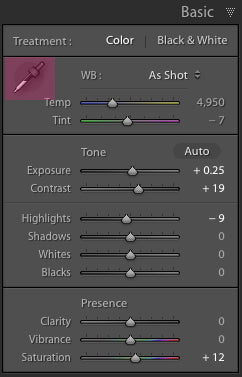
    4. Add some contrast and bring in some exposure to the photo. Just adjust the contrast and exposure bar as you seem fit.


    Adjusting for the grain

    Check the darkest areas of your image, like the floor or corners. Often these are the parts that have the most grain. To retouch for the grains, follow these steps:

    Luminance noise reduction lightroom
    photo by photographingspace.com

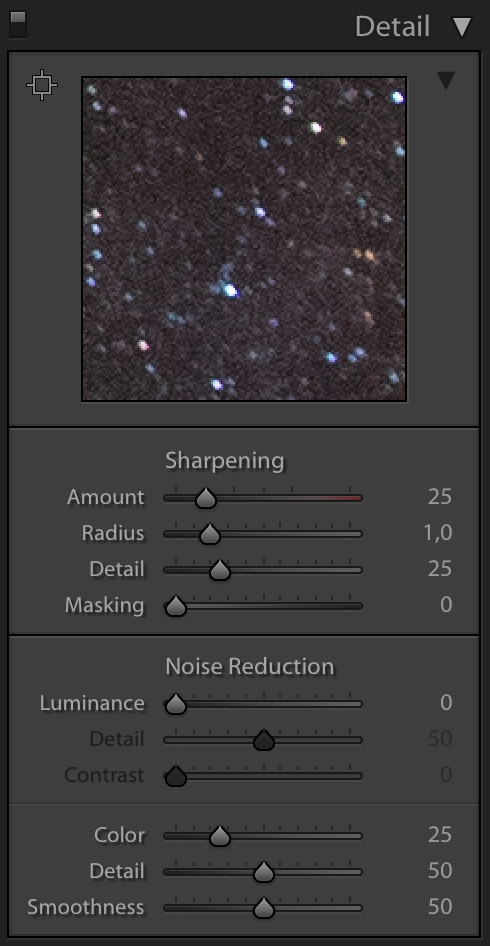
    1. Adjust the luminance under the noise reduction module. Drag the bar to 40 or until the green grain gets neutralized.
    2. Adjust the amount of sharpening to around 90 to make the photo very sharp.


    Doing some lens correction

    Lightroom Lens Corrections
    photo by photographylife.com

    Lightroom’s lens correction tool is a very handy module that corrects the different optical issues on most lenses. It’s a quick and powerful tool that can be used on photos.

    1. Just go to the lens correction module and check enable profile corrections. This automatically adjusts your photos and can bring about such big difference in the after photo.
    2. Go to the color tab under lens correction and check remove color aberration.


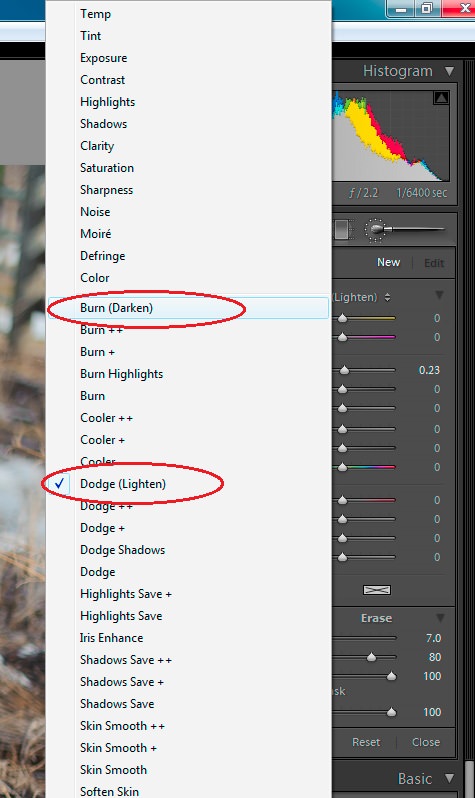
    Dodging and burning

    Adding some interesting lights on the image is possible through Lightroom. Doing some dodging and burning on the photo will add some extra light. This can be great for images with lighting fixtures as this creates more realistic lighting.

    dodge and burn lightroom
    photo by photographylife.com

    1. Take your brush tool and make sure that you adjust the exposure, feather, flow, and density. Keep these high in order to create effective streaks of light.
    2. Drag the brush on the areas where the light beams from the fixtures are naturally hitting, like the floor or ceiling. Drag over these areas to brighten the area. This technique adds some shine on the light in the room.
    3. You can create a new brush with every beam that you add to make the light beams different every time.

  • Simple Guide to Enhance Real Estate Photography Using Photoshop

    Simple Guide to Enhance Real Estate Photography Using Photoshop

    As a real estate photographer, there is a lot that goes on a day of photo shoot. Finding the right time of the day, good lighting, and good angle are all necessary to create great photos. In addition to that, the right gears are also important. However, most of the work goes beyond the shoot. Real estate photography editing and retouching take a lot of time to enhance real estate photography.

    Retouching skills are necessary in order to beautify and create amazing photos that make potential buyers interested in the property.

    Here are some tips for using Photoshop to enhance real estate photography:

    Using Hue and Saturation

    hue and saturation

    Hue and Saturation is a great Photoshop tool to correct colors. It has different options that you can play around with. One of the typical color errors in real estate photography has to do with adjusting the greens. Capturing the vibrant exteriors, like the grass and trees can be challenging for newbies. To accentuate the greenery follow these steps:

    1. Open your image in Photoshop and select Image menu. Choose Adjustments and click on Hue and Saturation.
    2. Select Yellow from the drop-down menu on the dialog window.
    3. You can adjust the Hue to +15, drag down the Saturation to -5, and the Lightness to -5.
    4. Select Green from the drop-down menu and make the same adjustments to Hue, Saturation, and Lightness.
    5. Click OK.

    With this technique, the changes are usually subtle. However, you’ll notice more vibrancy in the grass and make it stand out more in the photo.

    Adjusting the brightness

    Adjusting the brightness

    When shooting exteriors of properties, getting a balanced light can be a challenge especially if you’re working with direct sunlight. There will be dark and shaded areas and brighter areas. Editing the photo in Photoshop might be the best solution for this issue.

    1. Go to the Image menu. Then, choose Adjustments and Click on Levels.
    2. Drag the center bar to the right in order to tone down the super bright areas.
    3. Click OK.

    This will add more contrast to the image. This tones down a lot of the brightness in the photo.

    Darkening the grass color

    Darkening the grass color

    If you see the grass a bit brighter than it should be, do a little retouching.

    1. Go to the Toolbar and right click on Burn tool.
    2. Select the right size of your brush. Go for a larger brush if you’re working on a larger area and a smaller brush for some details. Drag over your brush to the grass. This darkens some of the grass and leaves.
    3. Stop only when you get the contrast that you want.

    Straightening the home or property

    Straightening the home or property

    Having straight lines on your image is important to make the property look its best. Often when the camera is not angled correctly, you might have slanting lines. To correct this, follow these steps:

    1. Click on the Rectangular Marquee tool from the Toolbar.
    2. Select the entire image.
    3. Click on the Edit menu and choose Transform.
    4. Click the Skew option from the drop-down menu.
    5. Drag the corner of the photo to the left, if the house or property is leaning to the right. You might also need to pull the right corner a bit to balance it out. Make sure that you do not pull too far as this goes way past realistic. Make sure that the edges are aligned and are straight.
    6. Once you’re done click on the check button.

    This technique also works in straightening up the edges for interior shots.

    Evening out the lighting in the interior

    Evening out the lighting in the interior

    For interior shots, there might be instances when either half of the photo is darker than the other half. Lighting up every corner of the interior can be a challenge.

    1. Go to the Dodge tool and choose the right size of the brush to work with.
    2. Drag the Dodge tool over the darker areas to add a bit of brightness.
    3. Go to the Filter menu, choose Sharpen, and click on Unsharpen Mask.
    4. Raise the amount in order to get clearer details. Click OK.