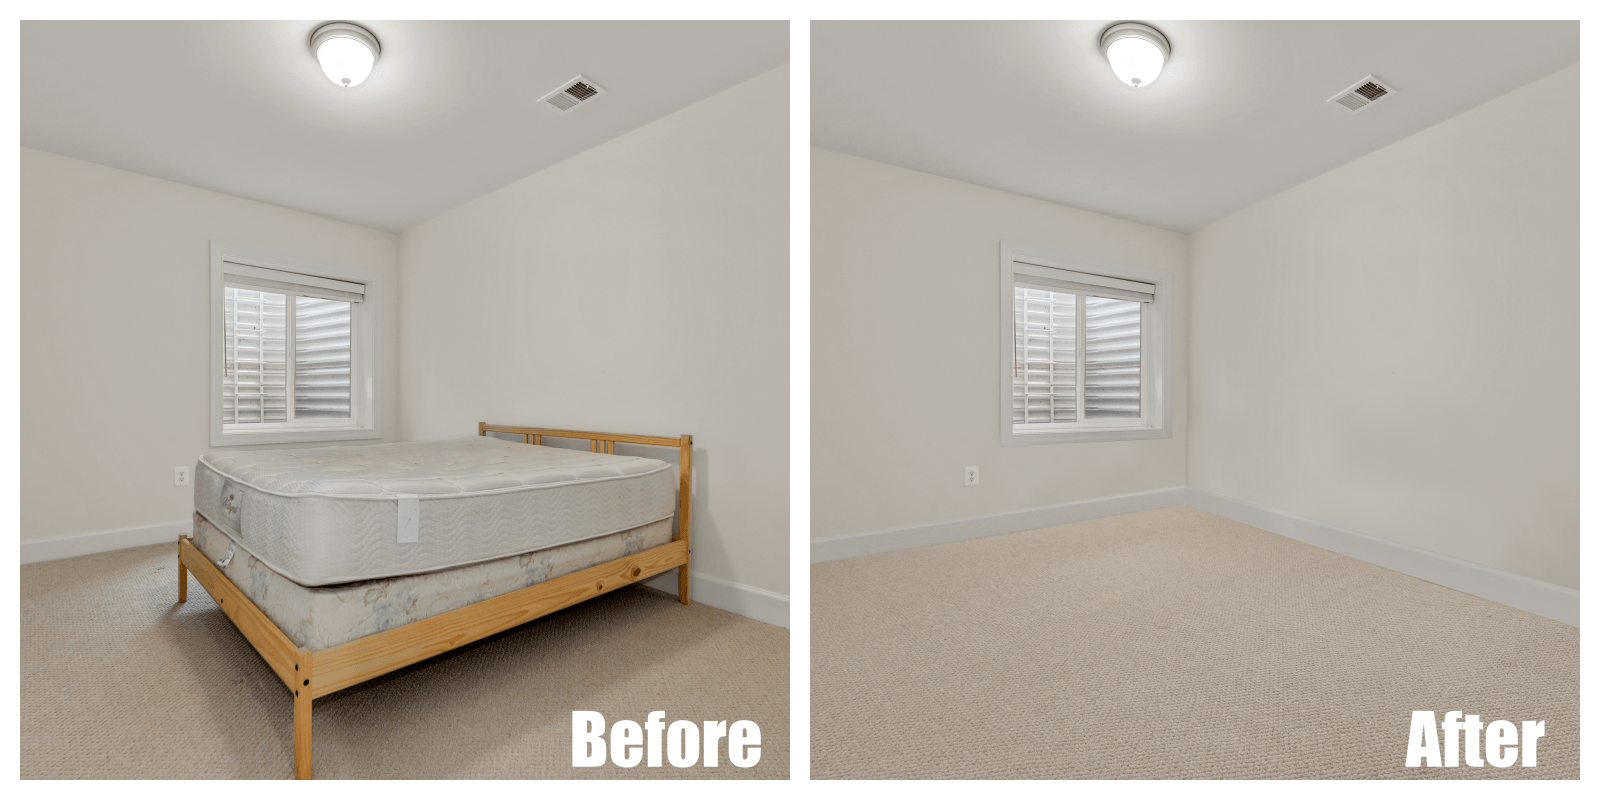
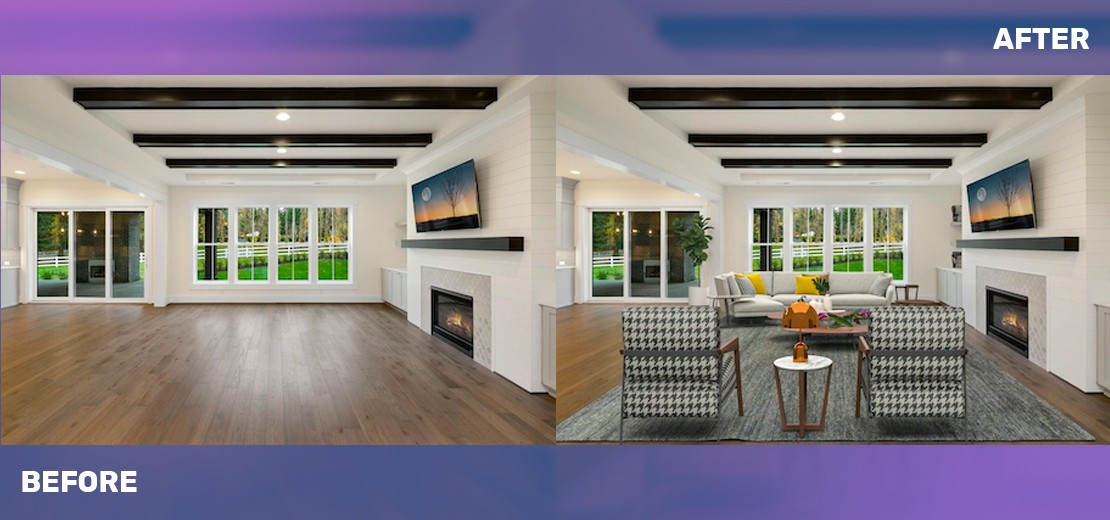
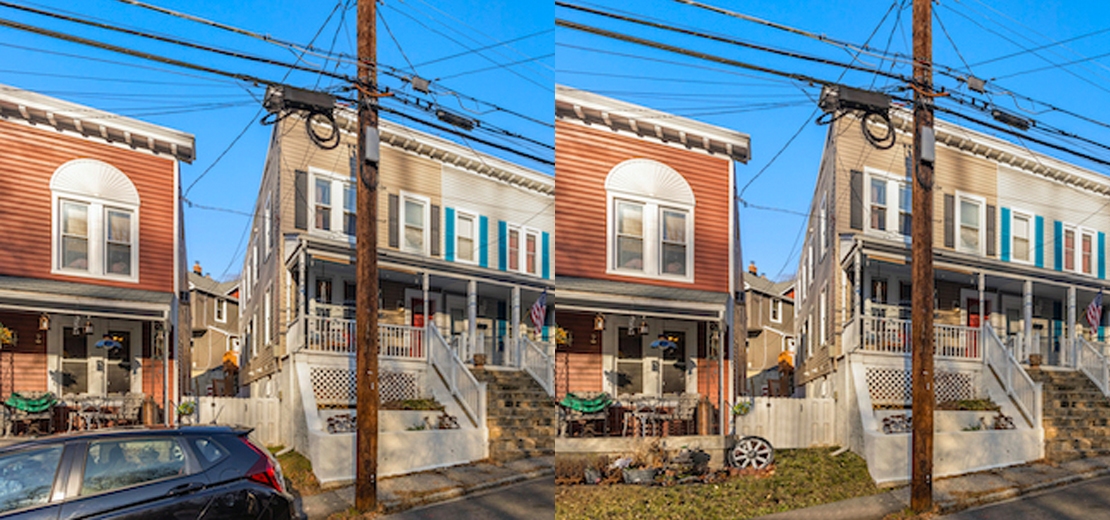
Category: Real Estate Photo Editing

  • 3 Impressive Tips on How to Reduce Noise in Real Estate Image Editing

    3 Impressive Tips on How to Reduce Noise in Real Estate Image Editing

    The real estate industry is one of the sectors that require high-level photography skills. Property buyers appreciate the visual appeal, so every picture needs accurate exposure levels and the slightest noise. Whether you’re using a digital single-lens reflex (DSLR) camera or just a mobile device, you can create the perfect image by practicing basic noise reduction techniques.

    Less is more in property photo editing, so sometimes, all you need are excellent principles to produce beautiful photography. You can optimize your overall aesthetics, whether you’re shooting landscapes or indoor scenes.

    Check out the following simple yet highly efficient tips on reducing photo noise:

    1. Shoot RAW

    One of the primary digital photography principles is to shoot the images in RAW format. RAW files contain thousands of information like a film negative for traditional photos, and they are easier to edit and manipulate. The advantage of shooting RAW is accurate data without compression, and the disadvantage is its heavy file size.

    The compression from Joint Photographic Experts Group (JPEG) and Portable Network Graphics (PNG) formats could significantly reduce your image quality. Sometimes, the compressed information could lead to pixelated or noisy images.

    2. Manage your Exposure Settings

    Exposure is one of the many ways to improve noise reduction by handling ISO, shutter speed, and aperture settings on your camera. Controlling image exposure is one of the best ways to reduce noise in your property photo editing efforts.

    First, let’s define the three terms. ISO is the camera’s light sensitivity setting; Shutter speed is the velocity by which the camera shutter opens and closes after collecting light; Aperture is the lens opening where light passes. The three settings control the amount and behavior of light that appears in the photo.

    Here are some of the tips in operating ISO, shutter speed, and aperture:

    • Keep the ISO low to avoid white noise, especially in well-lighted conditions.
    • Shutter speed is known as the length of time that the camera shutter is exposed to light. If you want a crisp photo without motion blur, keep your shutter speed at the minimum. More extended shutter speed opens your camera to light longer that allows blurring and motion effects.
    • The size of the aperture should be proportional to darkness. Therefore, the darker environment, the larger the aperture to allow more light. Alternatively, you should reduce the aperture in bright light conditions to avoid over-exposure.

    Take the time to check the different effects for various camera options. Although it’s often tempting to yield to default or automatic, you should try the various manual settings before the shoot.

    3. Sufficient Lighting

    Similar to having the correct exposure settings, you should have sufficient lighting to ensure reduced noise from your property images. Balance is a good rule to remember when doing real estate image editing because too little and too much light could significantly impact image quality.

    Here are some lighting tips to reduce noise in photo manipulation:

    • Don’t depend on natural light alone, and add other light sources, especially on cloudy days.
    • Get reflectors and other soft light sources.
    • Avoid harsh light or flashes.

    It would be best if you considered the depth and focus when doing real estate photos for listings.

    The Bottomline

    Photographic noise makes an image look dusty and dirty. Real estate image editing is more challenging due to the missing pixels from the noise. If you’re planning to take real estate photos, you need to ensure limited static and motion for the best photo quality. You don’t need expensive equipment to reduce the noise; you only need to use the appropriate settings.

  • Phixer vs BoxBrownie: Innovative Real Estate Photo Editing Companies Value Comparison in 2021

    Phixer vs BoxBrownie: Innovative Real Estate Photo Editing Companies Value Comparison in 2021

    Community lockdowns have increased the demand for real estate because of the buyers’ need for well-situated homesteads. Professionals that need space for home offices have upgraded their temporary apartments to permanent homes. The competitive real estate industry continues to evolve as most consumers and buyers rely on the internet to automate and accelerate transactions. Technology is at the forefront of all developments.

    The past decade alone has introduced innovative real estate technologies such as business intelligence through big data, virtual reality (VR), augmented reality (AR), artificial intelligence (AI) algorithms assistance, geolocations, and smart homes. One of the most significant improvements in recent years is the technology that improves aesthetics and visual appeal.

    [lwptoc]


    TL;DR: Companies like Phixer and BoxBrownie have been at the forefront of real estate editing.

    Real Estate Photo Editing Company Must-haves

    Photography and photo editing technologies have immensely improved most of the images you find in real estate listings. While there are ongoing debates on how much retouches, virtual staging, and editing one should do on their property images, it doesn’t change the fact that people are more inclined to buy something that looks appealing.

    Before diving into the specifics of real estate photo editing, let’s talk about the key characteristics to consider when looking for a real estate photo editing company:

    • Value for money
    • Industry experience
    • Turnaround time and pacing
    • Customer service
    • Technology
    • Passion for quality

    Hire a company that understands your vision and turns it into reality. Here are some of the critical comparisons between Phixer and BoxBrownie:

    Phixer vs. BoxBrownie

    1. Value for Money and Pricing

    Photo editing is an investment for better real estate sales. People often refer to the extras that come with the service when talking about value for money or return on investment. 24-7 customer service and chatbots are already the gold standards in 2021, so it’s essential to look beyond the normal.

    Here are the comparisons on freebies and pricing:

    • Signup promotions for new accounts – Phixer provides a limited-time offer of 30 free edits or three projects with up to ten completed photos in a trial account; Phixer also offers free ten credits for downloading the Phixer mobile app. BoxBrownie gives free three image enhancement edits and one day-to-dusk edit upon signup.
    • Do-it-yourself options – Phixer has a mobile app that allows you to make edits yourself using credits, and the easy revision system will enable quick image corrections. BoxBrownie has an unlimited change guarantee.
    • Bulk payment options – Phixer allows bulk payment options for credit purchases. BoxBrownie charges fixed rates depending on what you need.

    Both real estate professionals have global teams that guarantee the best possible service in the time needed.

    2. Industry Experience

    One of the critical things to consider when hiring a photo editing company is the experience in a given industry. Both real estate photo editing companies have solid industry experiences, and they have a long list of satisfied clients that rely on how they edit real estate images.

    Phixer specializes in the real estate industry. The company has over 12 years of experience with over 800 global employees, including photo editors, AI engineers, 3D artists, and full-stack developers. Phixer processes over 50,000 real estate images and videos a day from international clients.

    BoxBrownie is a generalist that offers a wide range of services, from real estate photo editing, automotive photo retouching to copywriting. The company has almost seven years of experience offering services to multi-lingual clients in 102 countries.

    Besides industry experience, it would help if you decided to hire a specialist or generalist for your photos.

    3. Turnaround time

    We currently live in a fast-paced world, and turnaround time makes all the difference from shooting to publishing. Real estate professionals should post listings and opportunities as soon as possible to shorten the time between the photoshoot and closing the next sale.

    Phixer offers a 24-hour turnaround time that starts after the client completely uploads all the photos into the system. The company grants an option of 12 to 18 hours with a rush fee. The Phixer app allows quicker edits and a quicker turnaround time of up to 8 hours.

    BoxBrownie offers a 24-hour turnaround time for most projects and a 48-hour turnaround time for virtual staging. The company’s expansive catalog may have different accomplishment times, so it’s best to consult them before booking a particular product or service.

    Both companies have dedicated professionals on standby 24/7 for quick turnaround times at affordable prices.

    4. Customer Service

    Customers need essential tools and support options such as chatbots, commenting, email, and live correspondence. These conveniences allow the client to ask questions and get quick answers about their needs. Both Phixer and BoxBrownie have customer support on standby for concerns and inquiries.

    5. Technology

    Innovations such as automation, user interface (UI), user experience (UX), website functionality, and other elements improve the overall client experience. However, one client’s dream may be another client’s nightmare. One customer might want all of the information readily available in their local language, while another may want to talk to customer support for those specific concerns.

    The Phixer website has an organized and minimal look, which gives you more information without the clutter of too many words. It looks sleek, neat, and easy on the eyes. The intuitive design provides the client with the freedom to choose without analysis paralysis.

    The BoxBrownie website looks like a one-stop-shop for every graphics-related product you might need. It has an organized catalog of all possible services with their corresponding price ranges. The website is available in multiple languages.

    The Phixer mobile app, available for iOS, is a notable difference in technology between the two companies.

    Choosing Real Estate Photo Editing Companies

    Property listing photos make or break your real estate deals, so it’s crucial to let the professionals do what they do best. However, there is no one-size-fits-all solution to real estate photo editing. The only tangible way to know which company delivers better service than the other is to avail of their freebies, look over their portfolios and check out what previous clients have to say.

  • 5 Tips for Collaborating Successfully with a Real Estate Photo Editor Every Time

    5 Tips for Collaborating Successfully with a Real Estate Photo Editor Every Time

    The competitive real estate industry heavily-rely on visuals to sell houses and properties. Most customers prefer well-composed photographs that they can imagine living in. Beautiful real estate photos don’t happen by accident— a team of experts, including photographers and photo editors, conceptualized and worked in post-production to enhance those images.

    If your company already has an in-house photographer, it’s better to collaborate with an editing company or a freelance editor. Most photo editors have niche specializations such as real estate photo editing, primarily dedicated to property listings or promotional purposes.

    [lwptoc]


    TL;DR: Here are some tips for effectively cooperating with a photo editing specialist:

    Collaboration Tips in Real Estate Photo Editing

    1. Contact a reliable company or freelancer

    First of all, make sure that you are contacting a reliable photo editing expert. You might need a whole team or just one person depending on the amount of work necessary within a specific period. Your requirements and budget will ultimately decide what kind of help you should get.

    Here are some of the ways you can check the editor’s competence:

    • Look for certificates or experience as property photo editors.
    • Verify the track record of satisfied clients.
    • Assess their editing portfolio styles to see if they match with what you’re looking for.
    • Check the conversion or results of their real estate property images.
    • Consider the work ethic.

    There are pros and cons to hiring a company as opposed to hiring a freelancer. If you want something more advanced, you can check alternative options such as virtual home staging solutions.

    2. Communicate your standards and roles clearly

    Varying expectations are some of the problems you encounter when dealing with real estate photo editor companies or freelancers. There may be standards or principles that you expect your employees or contractors to adhere to, and the best way to avoid conflict is to address these beforehand.

    Here are some tips on what you should do at the start of a project:

    • Set goals and deadlines for each deliverable.
    • Ensure that everyone understands their part in the process.
    • Visualize the entire workflow so that members know whom they are working with and whom to ask for questions or more information
    • Illustrate a project timeline to check for possible bottlenecks or inefficient processes.

    Successful collaboration depends entirely on your ability to interact and set working expectations from every group member. Photographers, editors, managers, and other relevant members should understand their roles well before starting.

    3. Segregate communication channels

    Group members need to be able to communicate with each other effectively. Photographers and editors should develop a collaborative atmosphere so that real estate photography projects can succeed. Everyone should be comfortable enough to voice out their professional opinions.

    Here are some tips for moderating project communications between real estate photographers and editors:

    • Create separate communication channels to broadcast specific concerns such as updates, discussions, personal opinions, project bottlenecks, resources, and other relevant divisions.
    • Keep the respective channels focused on their dedicated topic/s.
    • Encourage proper communication from all parties, and not just one-way announcements.
    • Resolve conflicts as soon as they arise.

    Channels with chatbots or helpers can improve communication efficiency and time management, so make sure you check out what options are available for you.

    4. Ask for feedback from other people

    Art forms are often subjective. What looks good to one person may not necessarily comply with current industry standards. There is no single right way to accomplish real estate photo editing, so it’s essential to show your output to many different and relevant people.

    However, you should limit your audience to those interested in purchasing your real estate properties. Here are some examples of people you should ask for feedback:

    • Property buyers or previous customers.
    • Renters or tenants.
    • Company decision-makers.
    • Potential partners.

    Open your real estate images to constructive criticisms so that you can establish beneficial short-term and long-term changes. It would help if you could face differences in opinion, especially as buyer preferences evolve.

    5. Use home staging technologies

    The good thing about doing business in the 21st century is the presence of accessible, innovative, and ever-changing technology. Some processes within the project workflow may take more time than necessary, so it’s crucial to automate your processes.

    For example, you are selling more than one house with similar dimensions and interior designs. You can have your monotonous and similar photos edited with virtual home staging technologies to create variations without spending more money on traditional home staging.

    Here are some of the things you can improve with virtual staging technology:

    • Remove unappealing elements or characteristics.
    • Add unique touches.
    • Improve current layout, and show alternate designs.
    • Show clear perspective and dimensions.

    If several homes in a particular area have been in the market for a while, traditional lighting and texture edits may not be sufficient. You might need to reimagine the photos with the help of virtual staging software and products.

    Ideal Real Estate Photo Editor Characteristics

    Aside from the obvious technical requirements, the project would flow better if you worked with an editor with an inherent passion for home photography editing, teamwork, and task accountability attributes. An editor should also have a keen eye for details and practical team communication skills.

    Check out other in-demand property photo editor characteristics.

    If you want to deal with a system instead of a person, the ease of access and ability to accomplish client and company demands would be your top considerations. You can opt for virtual home staging and other digital imaging or enhancement programs if you don’t want to go through all the trouble of hiring and training an editor.

    Conclusion

    Real estate is still competitive in 2021, and visuals will make a considerable difference in how well your properties sell. If you feel like your outdoor and indoor property shots are underwhelming due to lighting or the weather, you should contact a professional real estate photo editor to retouch or add flair to your images. A reliable, professional virtual staging could also help ease your editing processes.

  • 4 Reasons Real Estate Photographers Love Virtual Staging

    4 Reasons Real Estate Photographers Love Virtual Staging

    In 2021, more people are looking for comfortable homes, and bare real estate properties no longer reflect their potential as effectively. A survey held by the National Association of Realtors revealed that 10% of agents think buyers believe properties for sale should look like those seen on television.

    Historically, real estate developers showcased model properties for potential buyers. Since the internet has made shopping for homes online easy and convenient, real estate agents need to use more modern marketing methods. Technology has opened doors to innovative solutions for traditional problems. The ecommerce industry has aggressively flourished along with conventional brick and mortar retail shops.

    In the same manner, real estate industry professionals use time management apps, planning programs, and inventive marketing solutions like virtual real estate staging to maximize reach and sales.

    What is Virtual Staging

    Virtual staging is the digital equivalent of home staging. It’s the process of enhancing the appearance and appeal of an existing property by decluttering and redesigning the space. According to the National Association of Realtors (NAR), 83% of real estate agents said that home staging enabled the buyers to imagine the property as a potential home.

    Here’s how Phixer’s Virtual Staging process for photographers works: Photographers take high-quality empties first. These images are then passed to virtual staging editors who correct lighting, texture, dimension, and apply furnishings aligned with the target market, saving time, money, and upping listing caliber.

    Photographers consider virtual property staging as a total no-brainer solution in property promotions. Here are some of the reasons why they prefer virtual real estate staging:

    Virtual Home Staging Advantages for Professional Real Estate Photographers

    1. Lesser cost than traditional home staging

    A few decades ago, real estate developers had to build showcase rooms for brochures and other promotional photos by renting or buying expensive aesthetic pieces and furniture. With recent breakthroughs and improvements in 3D imagining technologies, customers can view digital showrooms at a significantly lower cost.

    Photographers also prefer digital staging because they don’t have to travel to different locations. Aside from that, there may be lighting constraints, so they can’t shoot at night. Ultimately, digital staging costs lesser time and effort.

    2. Modification on lighting and textures

    Real estate photographers may have issues with the products in the property or showcase room. Replacing or removing obstructive objects might be expensive or a hassle altogether. Virtual home staging allows texture and lighting modifications to ensure maximum aesthetic value.

    You can digitally alter artificial lighting to look like natural daytime brightness and remove shadows. You can also remove or add textures to enhance the room’s homey qualities.

    3. Accurate scaling and dimensions

    Inaccurate scaling is one of the unavoidable concerns that photographers face in the real estate industry. Several factors like blockage, perspective, and lens sizes could cause objects to appear smaller or larger than they are. Conducting partial photo manipulations could make the entire image look unnatural altogether.

    A virtual staging service will adjust the dimensions and ensure that the whole property looks as realistic as possible.

    4. Designed according to the target market

    Photographers often depict specific real estate properties according to what appeals to their target market. However, they may want to remodel or reimagine one property to suit another demographic. Time and budget constraints might hinder potential sales.

    For example, a sizeable 2-bedroom apartment unit situated near schools and offices could appeal to a broader age range. Professional virtual property staging saves money and time on creative redecorations and adjustments. You can reimagine one listing in several colors or styles.

    Virtual Staging Service

    You might want to conduct an aesthetic review to see why some of your excellent properties don’t sell as fast as others. The images may not be as appealing as their competitors’, and you may need to update them. Companies like Phixer specialize in virtual real estate staging to ensure that companies maximize the property’s potential and appeal.

    Frequently Asked Questions

    Does virtual staging replace good photography?

    No. It builds on quality photography. Clean, high-resolution shots are vital; virtual staging enhances them further.

    Will virtual staging adjust for skewed perspectives?

    Yes. Editors correct perspective, scaling, and lens distortion during staging.

  • 5 Reasons Why You Should Choose Phixer For Real Estate Photo Editing

    5 Reasons Why You Should Choose Phixer For Real Estate Photo Editing

    Real estate a lucrative industry. It always has much more to offer.

    It is indeed a remarkable career to nurture, with many opportunities to offer to other people like photographers and editors. These people make your listings stand out and be recognized by potential buyers.

    You may wonder why but come to think of it. Without these people, your real estate listing photos are nothing but dull and unappealing images that do not attract buyers and secure possible sales.

    You do not want that included in your website or listings because they are just awfully not enticing. At the very least, you need to secure some decent images of the property you are trying to sell. Remember that these photos are not the usual ones; they always have something that makes them stand out.

    There are a bunch of real estate photo editing companies out there, but it is best to have that “trusted one.” Take a look around your neighborhood and ask yourself, which one should be my partner in every photo editing session I need?

    [lwptoc]


    Sure enough. This is never easy. But if happen you are looking into someone to edit your property photos, take a look at how Phixer can help you.

    TL;DR: Here are five reasons why you must choose Phixer for your real estate image editing needs:

    Professional Outputs

    Phixer is the leading real estate image editing company that is known for its first-class and high-quality real estate images. With years of expertise, the company has become a household name for realtor’s photo editing materials. There is no room for any substandard pictures.

    Affordable Packages

    If there is one thing that realtors are hesitant about when it comes to photo editing, it is the price. However, Phixer has been very consistent in offering packages at a reasonable price so realtors can choose to work on a project within their budget without sacrificing the images’ quality.

    Streamlined Processes

    One of the main challenges that potential clients face during an editing session is the complicated process. Here at Phixer, the complex processes are removed from the picture, and the team only focuses on implementing a streamlined process that is easy to follow and fulfill.

    Expedited Timeline

    In real estate, timing and relevance are essential. A listing for a spectacular property needs images before being put online. It cannot wait. This is the right thing with Phixer – you do not need to wait for long because there is a guaranteed expedited timeline (12-hour turnaround time) for every project. This is possible with the help of a team of expert editors who work diligently to fulfill all works at confirmed dates and times.

    Advanced Technology

    Phixer is dedicated to giving professional-looking real estate images using only the best technology in the market. You can expect to get compelling images using state-of-the-art equipment and other editing software that guarantees the best outputs. Moreover, the overall process is managed by experts who know how the technology works, including the best practices to create beautiful pictures.

    So, what do you think? It is best to always think about this beforehand to have enough time to search for the best editor.

    You know, this list can go on, but it is best to let you discover how Phixer differs from other real estate image editing companies. After all, you will only work with the company you believe in and trust.

    In the end, it is best to evaluate your choices alongside the budget and timeframe you have in mind. There is no pressure; just take the time you need. What matters is the possibility of getting great images to go with the listings.

  • 4 Popular Interior Designs for Virtual Staging

    4 Popular Interior Designs for Virtual Staging

    When it comes to home staging, there is a specific style that designers follow. This is true, even if virtual staging is not the traditional home staging that involves physical furniture and fixtures.

    Every realtor knows this, giving homeowners a new option to stage properties without spending much.

    However, you need to know one thing: virtual staging still needs a theme of furniture style. It is an integral part that you should not overlook.

    So, unless you are a professional interior designer, you need to have a working knowledge about the styles you can integrate into your virtual staging images.

    Here are some of the best interior design styles you can check.

    Classic Style

    The classic interior design is inspired by the art of ancient Greece and Rome. It comes from the idea of classicism that originated in France in the 17th century.

    This style has a long history, but it never goes out of fashion. It is mostly preferred by wealthy people and those who prefer age-old values ​​and traditions instead of modern style.

    Among its key features are the following:

    Color

    Most classic furniture has dark and neutral colors such as mahogany and beige. If you want other colors, you can try cherry, hazelnut, gold, or black but make sure that it is complemented with the rest of the design.

    Interior Light

    It is common for the lighting to see crystal chandeliers, lamps with transparent stones, or expensive glass.

    Usually, a chandelier is in the middle of the ceiling to give a more finished and striking look, together with other room’s fixtures.

    Classic Furniture

    Classical furniture is mostly made of precious woods garnered with expensive upholstery fabrics or natural leather.

    Often, it is varnished to make it look more attractive. It is also common to see gold carvings as decorations. If you plan to use the classic style, you need to have a unique and artistic composition in mind so everything can be done harmoniously.


    Contemporary Style

    Contemporary, also known as the modern style, brings users a simple yet elegant design. It is mostly associated with minimalism, wherein “less is more” is the usual mantra.

    Among its key features are the following:

    • Clean lines and smooth surfaces without intricate details
    • Metals and glass are often used for designs and furniture.
    • Furniture and appliances are mostly metals with sleek designs.

    Casual Style

    You can easily distinguish a casual style by plainly looking in the interior. If you can sense that the space, comfort, and beauty of the area radiates casual elegance, it is indeed a casually styled house.

    Many homeowners prefer it because it is virtually appealing, easy, and comfortable enough for the people living there to maintain.

    Key features:

    • The most common material used for furniture is a light wood, such as oak and pine.
    • Fabrics and textiles are often textured.
    • A casual home is universal with a simple and elegant design too.

    Scandinavian Style

    Scandinavian is inspired by the snow and mountains of the Nordic countries. The usual palettes used are minimalist with cozy accents and unique modern furniture.

    The standard features of a Scandinavian style are the following:

    • High contrast colors are visible.
    • Always have fireplaces and uses warm wood tones.
    • Neutral colors are standard such as white, blue, and yellow.

    So, what do you think? Which style suits your taste better?

    If you have not decided yet, it is best to evaluate your preferences and choose which one is perfect for your home.

  • 5 Best Noise Reduction Software for Professional Photo Editors

    5 Best Noise Reduction Software for Professional Photo Editors

    In the real estate industry, photographers and editors matter.

    Do you know why? Well, without them, your real estate images are dull and unappealing – something that you do not want to have as a realtor or property owner.

    While it is right to treat photographers with the utmost respect, you should do the same with your photo editor. After all, they hold the key to those picture-perfect listing images that can give you the deal you are aiming for.

    As real estate photo editors, they deal with different editing techniques to create stunning photos. One of these techniques is noise reduction.

    But what is noise, and why do editors need to get rid of it?

    What is noise in photo editing?

    Noise is usually a common topic in photography that is necessary to maximize photo quality.

    Contrary to the noise that you know, noise in photography refers to the grainy spots in photos.

    These spots make the photos look unpleasant and disturbing. Moreover, they are so evident that you can easily see the unwanted pixels by merely adjusting the images’ brightness by using Lightroom or Photoshop.

    Kinds of Noises

    Noises come in two types.

    The first one is the shot noise. This is the kind of random noise due to the photons in the scene. On the other hand, the second one is known as a digital noise and is caused by the camera’s sensor and internal electronics.

    Digital noise is often caused by using high ISO when there is no enough light. It is a common problem for indoor photography that is done during the night time.

    Here is one more critical point: you can fix a digital noise using post-processing software but not the shot noise.

    Hence, the best way to avoid them is by minimizing your images’ potential exposure to them. Here is how you can do a professional noise reduction using the widely used noise reduction software by photo editors today.

    Adobe Lightroom

    Lightroom is the best tool that can denoise almost all images. It has a straightforward interface with valuable editing solutions such as the noise reduction tool. You can find it easily inside the Detail tab.

    Noise Ninja

    This software promotes workflow quality and productivity. It can be mainly used for reducing noise in your images.

    There are the luminance sliders that will eliminate the noise brought on by color and light. Plus, you can also adjust the images’ Smoothing, Residual noise, and Detail.

    Noise Reducer Pro

    Noise Reducer Pro is an all-software for smoothing out your photo. It has a slider that you can use to adjust the amount of noise at varied noise reduction levels from medium, light, and custom.

    Adobe Camera Raw

    Adobe Camera RAW or ACR is somehow similar to Lightroom. It works manually via a slider found on the Detail tab.

    The Luminance slider can make the digital noise less visible by blurring them together. The typical setting should be between 20 and 40 to get a realistic and natural look.

    Topaz Denoise

    This software can be integrated into Adobe Lightroom and Photoshop. It is focused on minimizing digital noise in your images.

    The program works by collecting image data to remove noise and yields the perfect-looking images after.

    Topaz Denoise has more controls, such as shadow-tone restoration and color casts. However, you should convert RAW files to 16-bit TIFF files first before using this software to process the photos and perform well.

    So, what do you think about these kinds of software? Have you been using any of them now?

    If yes, then that is wonderful! You are so close to producing those stunning real estate images. But if you have not yet tried any of them, then do not waste any minute! Check out which one suits your photo editing needs.

  • How to do TV Screen Replacement in Real Estate Photos?

    How to do TV Screen Replacement in Real Estate Photos?

    As mentioned in the previous blog, manipulating a TV’s screen in real estate images is entirely possible.

    And the bonus part? It practically follows the step needed when adding that fiery fire effect on a fireplace in an image.

    Before going through the steps again, here is one good reason you should also pay attention to your TV’s screen when acquiring photos for your listing: it adds a “wow” factor to the property’s sophistication.

    Again, there is no room for dull and boring images when it comes to your real estate listings. You should have them look vibrant and colorful, drawing the attention of future buyers.

    Now, one question is this: is it mandatory needed?

    To be honest, it is not. But if you want to add value to your images, then doing this is a great option.

    For real estate photo editors, this work’s demand is apparently good, with several customers asking to get this done as part of the packages.

    Today, if you are one of those who want to learn how to do this on your own, then check out these three easy steps.

    Step 1: Preparation

    To make this work possible, you need to have the materials prepared. Mainly, you need to have that image you want to use on the screen.

    Among the most popular choices are natural images, beach photos, sunset pictures, or a new photo of your listing.

    Step 2: Open Adobe Photoshop

    After securing the photo you need, open the raw interior photo with a black TV screen and the image for replacement in Photoshop or other preferred software.

    Then, create the selection path by using the Pen Tool. Next, use Ctrl+Enter to select the path and copy the image to use for the screen replacement. You can easily do this by using the Ctrl + A and C functions.

    Step 3: Start the Replacement Process

    This time, open the main photo and use Alt + Shift + Ctrl V.

    Another alternative is to click on the “Edit” menu on the top bar and choose Paste Special. The photos should appear in the selected area.

    You can already see the image on your photo, but now that your image is on the TV, some adjustments may be needed. In this case, adjust the image using Ctrl+T to drag the photo and make it look smaller.

    Now, do a right-click and choose Distort to drag the four corners of the photos inside the TV’s corners.

    Lastly, change the blending mode to “Screen” for a good screen effect. Do not forget to reduce the image’s opacity to around 80% to make the image less intense and blend well in the screen.

    Important Pointers

    • Choose an appropriate image. It adds sophistication to the property.
    • Do not overdo it. Having an unnatural-looking photo is awkward.
    • If possible, consult your real estate photo editor.

    So, what do you think? Can you pull it off on your own?

    There is no harm in trying. You can give it a try, but if it is hard to achieve, do not hesitate to ask for help from your trusted photo editor.

    There is no pressure. Doing TV screen replacement is always optional and never a requirement. You can still have listing photos with just a blank TV screen and close a deal.

    This is only a suggestion that may work for you. After all, you need to determine which one works for you.

    Do you have other photo editing projects in mind but do not know where to get help? Let us know! We can help you.

  • How to Add Fire to a Fireplace Using Photoshop

    How to Add Fire to a Fireplace Using Photoshop

    Are you trying to add fire to your real estate images?

    Well, it sounds a bit odd but not impossible. With some properties with a built-in fireplace, it is never an issue to have a real fire in photos.

    But what if it is not the case?

    Do not worry! Your expert real estate photo editors can definitely help you add that specific detail in your images.

    Why should you make use of the fireplace?

    For sure, your real estate photos should convey the warmth and coziness of the place.

    Your clients should get this feeling at a glance. Many home sellers want to light up the fireplace because it makes the images look real and appeal to a buyer’s decision.

    In this case, it is best to seek the help of your trusted real estate photo editor and photoshop fire in your real estate photos.

    Here are three proven and tested steps that work well when modifying images to add that iconic fire beneath a chimney.

    Step 1: Prepare the Materials

    The very first thing you need to secure is a high quality image of the fireplace.

    You need this picture so that your real estate photo editor will not have a hard time polishing pixelated parts of the photo.

    Moreover, you need to secure a high-resolution image of flames that you can easily get online on stock photos website.

    It is best to choose a fire image that looks natural and not photoshopped.

    Step 2: Open Adobe Photoshop

    When it comes to photo manipulation, Photoshop is a known tool.

    However, you can use any software you like. There is no rule of thumb that it should be Photoshop all the time.

    Then, open both photos in Photoshop. On the photo with the fireplace, start creating an outline for the fire by using the Pen Tool.

    Then, copy the fire flame photo you want to add in the existing picture by using the shortcuts Ctrl +A and Ctrl + C.

    On the interior photo, use Alt + Shift + Ctrl V or choose Paste Special to place the image in the frame.

    Now, your fireplace has a visible fire already! All you need to do is to resize it properly so it will appear natural.

    Here is a quick way to fir the flame in the fireplace: use Ctrl + T, right mouse, and then choose Distort.

    It will drag the flame to fit the fireplace.

    Step 3: Use Screen Effect

    At this point, he flame should be visible in the fireplace already.

    The next thing you need to do is create screen effect by changing the blending mode.

    You should choose Normal to Screen and have an 80% capacity.

    If you want to make the flame more natural, get rid of the fire’s sharp edges by utilizing the Brush Tool.

    Are you able to follow everything?

    If yes, great! You should now have an enticing fireplace image.

    Bonus Tip

    Here is one more photo manipulation tip for you – replacing a TV’s LCD.

    You may think that this is a tedious work to follow but it is similar to the process mentioned in this article with the exceptions of the kind of images to use.

    It is quite simple and easy. Just continue to practice the skills everyday.

    So, what do you think?

    Is this something that you can pull off? If yes, then go ahead and start creating that wonderful fireplace image.

    Remember to include a fireplace photo in your listing, especially if the property you are trying to sell or advertise has one.

    Doing this can help you attract more buyers and close a deal successfully.